The Severed Gods Low, Mid, and High Zones
Match skill height to enemy limbs or pay in missed Breaks and wasted sever attempts.
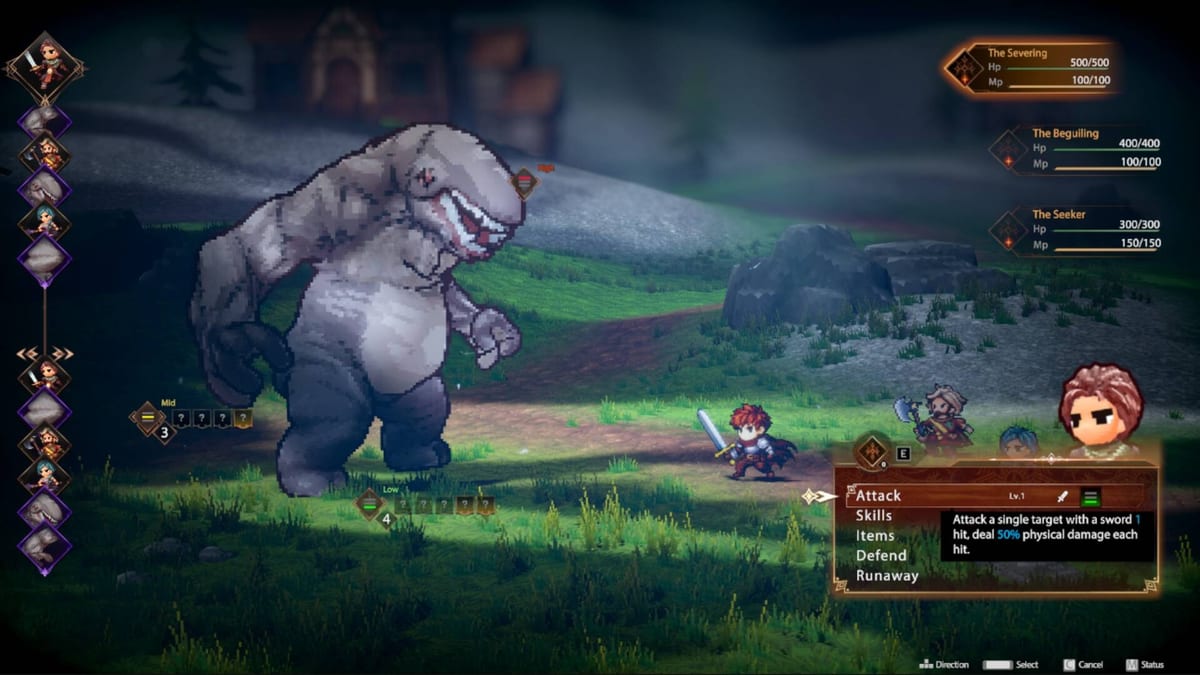
Combat in The Severed Gods is not flat. Enemies expose Low, Mid, and High target bands — feet, torso, head — and your skills carry height tags that must align or attacks miss or weaken. Topebox borrowed tactical clarity from classic turn-based RPGs but added limb severing on top. This guide explains height rules, accuracy penalties, throwable workarounds, and how zones scale across Worlds & Map Routing so your Combat: Break & Defend fundamentals translate into reliable severs.
The three height bands
Every combatant occupies vertical space:
- Low — legs, lower swipes, ground traps; common on skeletons and beasts
- Mid — arms, torso, core Break segments; default duelist band
- High — head, overhead casts, jump attacks; often tied to enrage phases
Skills display height icons matching hamburger-style limb UI. A Low slash misses a High-only telegraph unless you use height-changing tools.
Accuracy and mismatch penalties
Using a skill on the wrong band does not always hard-fail — many attacks land at reduced accuracy or damage. Community demo reviews highlight skeleton fights where foot strikes whiff while arm Break stalls. Penalties stack with status effects and elevation quirks on large bosses.
Mitigation checklist:
- Read enemy limb layout before first strike
- Draft at least one skill per band at Camp & Short Rest
- Apply Scholar debuffs that shift vulnerable bands
- Use throwable items to reach unreachable High targets temporarily
Break and Sever across heights
Break accumulates on the limb you target; height mismatch slows Break more than raw damage. Sever attempts require Break-ready limbs — usually Mid arms on humanoids or Low legs on quadrupeds. Boss guides in Sever Boss Limbs list per-fight priority limbs by height.
Axeman kits often hit Mid hard; Thief crit skills may spike High head Break for fast enrage clears. Swordsman stays flexible with balanced height coverage — ideal for Getting Started learners.
Zone difficulty scaling (Low / Mid / High areas)
Map zones share names with height bands but mean different things:
- Low zone nodes — weaker armor, forgiving intents, tutorial sever targets
- Mid zone nodes — dual intents, elite armor, injury persistence
- High zone nodes — boss gates, phase shifts, curse relic pressure
Do not confuse High zone map nodes with High height attacks. A Low zone fight can still require High head Breaks on tall enemies.
Throwable and reposition tools
When enemies hover out of reach, bombs and throwables bridge height gaps without wasting a full turn on movement skills. Demo v2.0.4 mouse support made targeting throwables easier — bind keys in Keyboard & Mouse.
Some relics grant automatic height shift on Break success; hunt these in world two drafts per Relics & Builds.
Multi-limb boss height puzzles
Bosses expose multiple bands simultaneously. Sever strategy often sequences:
- Break Low legs to slow charges
- Break Mid arms to disable telegraphed slams
- Sever High head only after arm removal reduces enrage
Phase shifts may relocate vulnerable bands — watch intent icons each turn.
Hero height coverage table
| Hero | Low coverage | Mid coverage | High coverage |
|---|---|---|---|
| Swordsman | Good | Excellent | Moderate |
| Axeman | Moderate | Excellent | Low |
| Scholar | Moderate | Good | Good (debuffs) |
| Thief | Good | Moderate | Excellent |
| Taoist | Moderate | Good | Moderate |
Full kits: All Heroes.
Practice drills
- Low zone: sever one Low limb on a beast elite
- Mid zone: Break Mid arm with height-matched slash
- High zone: head Break with throwable setup
- Boss: two-height sever chain without mismatch penalties
Track drills on Run Checklist.
Demo versus EA height content
Demo includes full height rules but fewer skills per band. EA’s 100+ skill pool fixes gaps via camp drafts. Trailer footage in the embedded video shows vertical boss scale — mechanics match EA with higher particle density.
Patch notes
Height accuracy constants adjust in patches listed on Updates Hub. After Break tuning, re-test High head strategies on Skills Tier List favorites.
Related guides
- Combat: Break & Defend — turn order and guard
- Sever Boss Limbs — limb priority tables
- Worlds & Map Routing — when to enter High zones
- Controls Hub — binding height cycle keys
Frequently Asked Questions
Quick answers to the most common questions.
What happens if I use a Low skill on a High target?
The attack may miss or deal reduced Break and damage depending on enemy type and skill tags.
Are Low, Mid, and High zones the same as height bands?
No. Map zones describe route difficulty; height bands describe combat targeting on limbs.
How do I hit unreachable High limbs?
Use throwables, height-shift relics, or Scholar debuffs that expose head Break windows.
Which hero handles all heights best?
Swordsman has the most forgiving spread early; Scholar fixes gaps with debuffs later.
Do vertical rules apply in the demo?
Yes. Height targeting is core in demo and EA; EA adds more skills per band.